Uploading files and images are an essential part of most web applications. There are many ways in which these uploaded files can be stored - such as in the File System, Cloud Storage, database using base64 encoding or CDNs. While file system and base64 are suitable for smaller applications, Cloud storage is the choice for most medium sized or large applications.
Azure Blob (Binary Large Object) Storage is a cloud-based data storage solution offered by Microsoft Azure. Its main advantage is that it allows users to store large amounts of unstructured data with a pay-as-you-go pricing. This ensures that we pay only for data stored. We can store different files such as images, videos, and documents. These images or files can be served directly to the browser. We also get added benefits of cloud-based features such as security, backup, and disaster recovery.
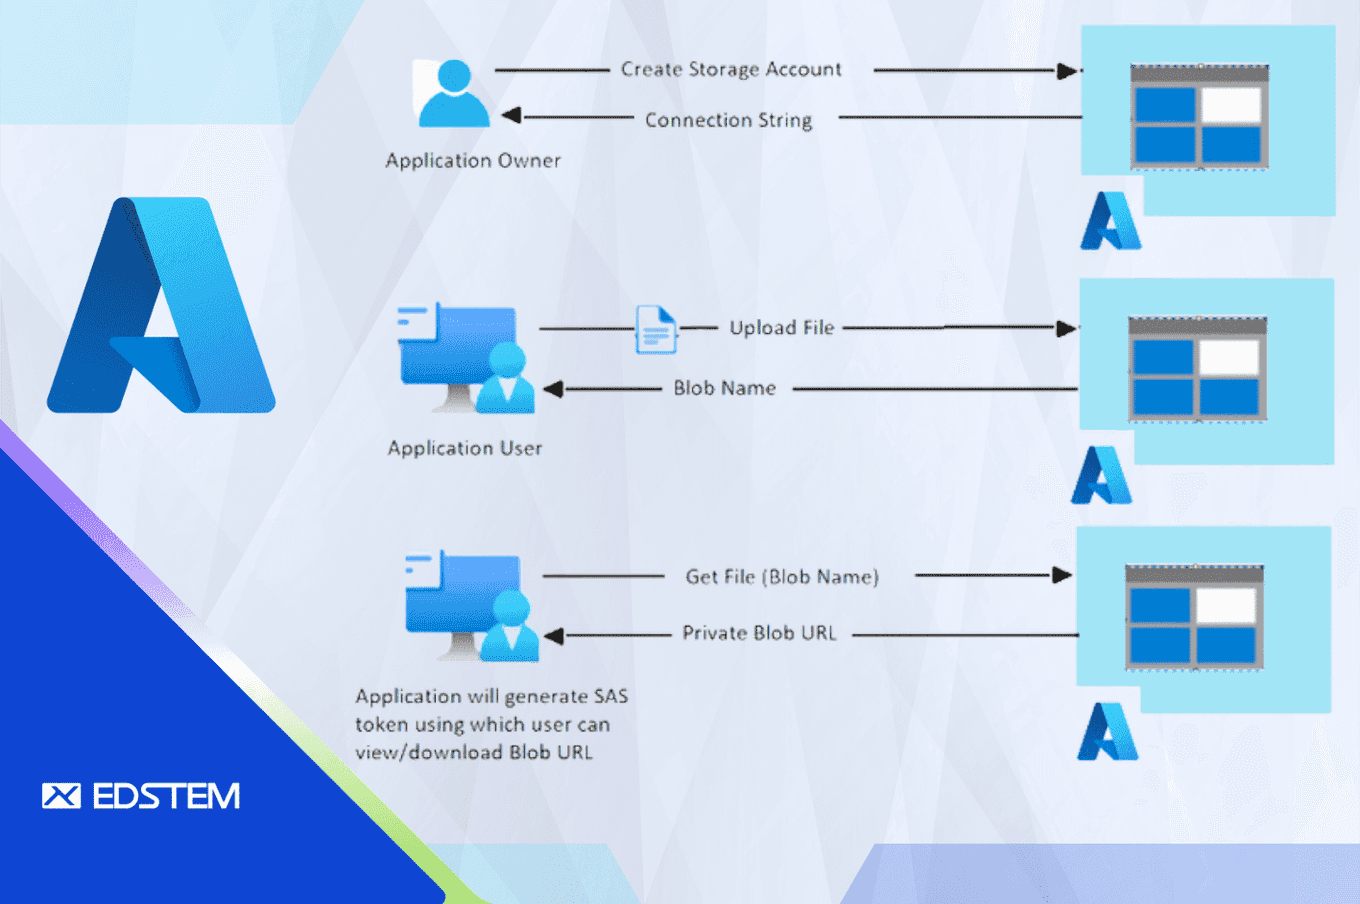
In this blog, we will cover the basics of securely storing and retrieving a file using Azure blob storage.
- Creating a Storage Account
- Creating a Container
- View Storage Account Access keys
- Uploading a File from application
- Generating and using a SAS token to retrieve the uploaded file.
1. Creating a Storage Account
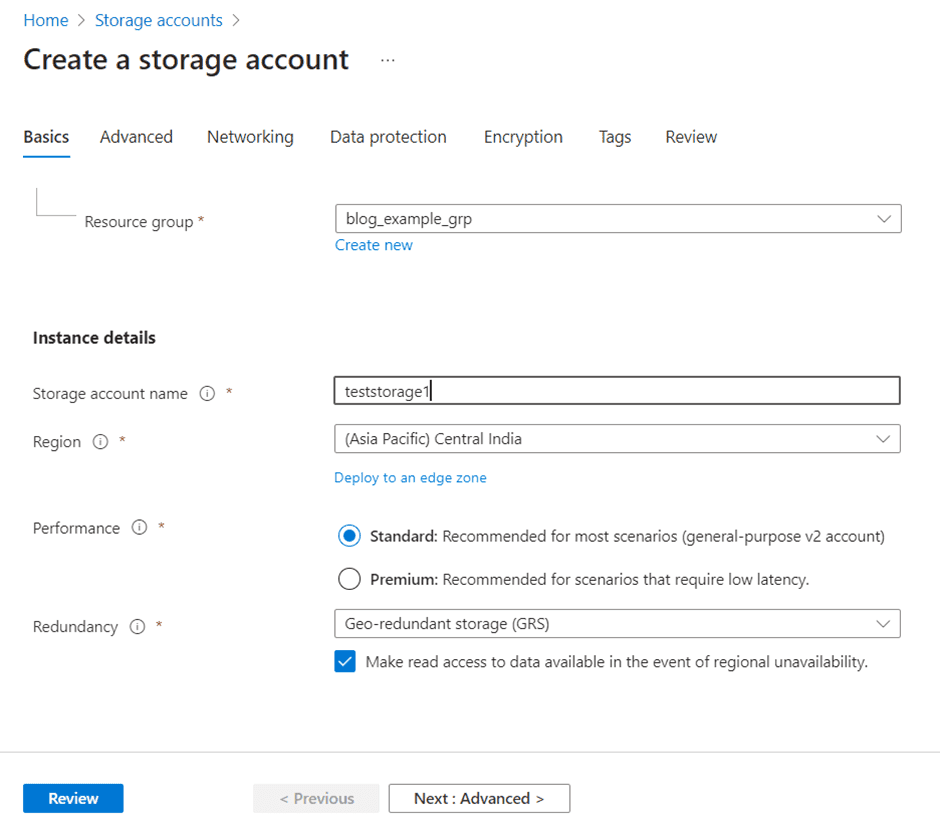
First, we need to have an Azure Subscription or a free Azure account. After login, we either create a new Resource Group or use an existing Resource Group. A Resource Group is a logical container for grouping Azure resources.
We can select the Storage Account from left menu and click on +Create. This will take us to a configuration page where we can enter the basic properties of the Storage Account. The basic configurable properties are -
- Resource Group
- Storage Account Name
- Region
Next in the Advanced Tab, we can enable Storage Account key access. This allows applications to access the Storage Account using account access keys.

2. Creating a Container
Once a storage account is created, we can select the Container from left menu and click on +Container. Only the Container name and Access level need to be entered.

Container name must be lowercase, must start with a letter or number, and can include only letters, numbers, and the dash (-) character. Access level can be Public Access, Blob Access, or Private Access. By default, the access is set to Private. We can keep it that way as our application should have secure access to the container.
3. View Storage Account Access Keys
When we create a storage account, Azure generates two 512-bit storage account access keys for that account. Along with each access key, it also provides a connection string. While access keys provide access to the storage account and its configuration, connection strings provide a way to programmatically access the storage account securely.
Azure provides two access keys and connection strings for added security. We can rotate them periodically at pre-determined intervals.
Access keys and Connection strings can be obtained from the Azure portal. Within Storage Account, under Security + Networking in the left menu, if we click on Access keys and then Show keys, we can view and copy them.
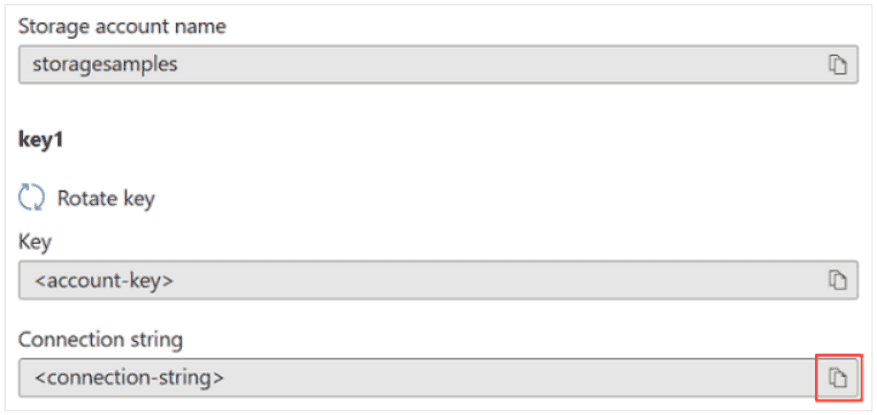
We can use either of the two keys to access Storage Account, but in general it is a good practice to use the first key, and use the second key later, while rotating keys.
4. Uploading a File from application
Since our storage container has Private access, we should connect using the connection string that contains other storage account details along with the access key.
Example of a connection string is as follows:
DefaultEndpointsProtocol=https;AccountName=**_storageAccountName_**;AccountKey=**accessKey**==;EndpointSuffix=core.windows.netThe connection string should be kept strictly confidential either in a .env file or in the application properties.
Example code in java for connecting to storage account –
// Code snippet 1

BlobServiceClient blobServiceClient =
blobServiceClientBuilder.connectionString(connectionString).buildClient();
BlobContainerClient blobContainerClient =
blobServiceClient.getBlobContainerClient(containerName);
Example code in java for uploading file to container –
// Code snippet 2

BlobClient blobClient = blobContainerClient.getBlobClient(
String.format('foldername/filename'));
blobClient.upload(data, size);
String name = blobClient.getBlobName();
Here data refers to the file that is being uploaded and “foldername/filename” refers to the blob name in which we want to store the uploaded file.
Suppose we want to store the file directly within the container we can only give a filename. Example: user_image.jpg
If we want to store it under a folder called users, we can give both foldername and filename. Example: users/user_image.jpg
We can create any folder and subfolder structure.
Example: users/accounting/user_image.jpg or users/it/user_image.jpg
To handle multiple users’ images, we could add a dynamic part to the blob name using UUID.
Example code in java for naming the blob file dynamically -
// Code snippet 3

BlobClient blobClient = blobContainerClient.getBlobClient(
String.format('users/user_image_%s.jpg',UUID.randomUUID()));
blobClient.upload(data, size);
String name = blobClient.getBlobName();
Once we get the blob name, we can store it in database. It can be used to access the uploaded file later.
5. Generating and using SAS token to retrieve the uploaded file
Using the blob name from the database, application can fetch the blob URL.
5.1) Example java code to get blob URL –
// Code snippet 4

CloudStorageAccount storageAccount =
CloudStorageAccount.parse(connectionString);
CloudBlobClient cloudBlobClient = storageAccount.createCloudBlobClient();
CloudBlobContainer container =
cloudBlobClient.getContainerReference(containerName);
CloudBlockBlob blob = container.getBlockBlobReference(blob name);
String blobUrl = blob.getUri();
However, this URL will not work as the access to the storage account is private. Application can get limited access to this URL by appending a SAS token to the URL. To generate the SAS token, application must specify the Start and Expiry time for the token, the Time zone for the Start and Expiry time and the Access permissions.
5.2) Example java code to create a SAS token –
SharedAccessBlobPolicy accessBlobPolicy = new SharedAccessBlobPolicy();
GregorianCalendar calendar = new
GregorianCalendar(TimeZone.getTimeZone('UTC'));
calendar.add(Calendar.MINUTE, 10);
accessBlobPolicy.setSharedAccessExpiryTime(calendar.getTime());
accessBlobPolicy.setPermissions(
 EnumSet.of(
 SharedAccessBlobPermissions.READ,
 SharedAccessBlobPermissions.WRITE,
 SharedAccessBlobPermissions.LIST));
 String sas = blob.generateSharedAccessSignature(accessBlobPolicy, null);
SAS token can be appended to the blob URL to get the SAS URL.
// Code snippet 6

String sasUrl = blob.getUri() + '?' + sas
Above SAS URL can be used to access the uploaded file
Conclusion
Thus, we see that storing and retrieving files using Azure Blob storage can be done in a few simple steps. Just as we keep important documents and valuables in a bank locker and can access them for a limited amount of time using our key, similarly, we can store data in private Azure blob storage container and access them using SAS token.We can store up to 500TB of data per storage account and there can be 100 storage accounts per subscription. Blob Storage supports the most popular development frameworks, including Java, .NET, Python, and Node.js.Moreover, it is the only cloud storage service that offers a premium, SSD-based object storage tier for low-latency and interactive scenarios, making it one of the preferred choices for data storage.